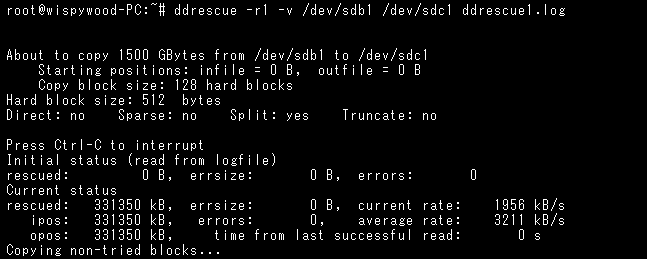
When a hard drive starts to fail, you have a limited amount of time to take action, and many online tutorials recommend making a clone of the affected disk before it becomes completely unresponsive. At Datarecovery.com, we recommend contacting a data recovery expert at the first sign of hard drive failure, as cloning a drive can prompt a failure and additional damage. However, if you intend to clone hard disks for any reason, it is important to use a safe process that will not introduce unnecessary risks to your data.

ddrescue is frequently recommended for hard drive cloning, as it is a powerful, free data recovery utility and included by default in many Linux distributions. It is extremely efficient, and because it doesn’t truncate files or write zeroes to its output file, it can be run successively to fill in bad sectors that were missed in earlier passes.
There are risks to consider — see the last section of this article for some important precautions — and it is no substitute for professional data recovery services, but it is an effective option for restoring low-priority data from a failing hard disk. This guide will explain how the utility works and how different commands can affect the tool’s functionality.
ddrescue should not be used on hard drives that make excessive sounds or that show any other signs of permanent damage. Likewise, you should not use this utility if you are at all confused by the command parameters discussed below.
Cloning Hard Drives with ddrescue
Before starting this process, you will need a copy of ddrescue (preferably on a CD or DVD), a fully functional hard drive, and the damaged drive. You can download the latest version of ddrescue here, or click here to download SystemRescueCD, a system rescue disk for Linux that can be used as a bootable USB stick or CD.
Of these options, we’d recommend using the SystemRescueCD, since it provides for a fairly simple hard disk cloning process with ddrescue.
To run ddrescue, use the following format for commands:
ddrescue [options] infile outfile [logfile]
With SystemRescueCD, you can output a list of devices by typing fdisk -1 at the root prompt. Run the utility with the command switches/options included below in order to get a clone of the drive as safely as possible.
To image from disk to disk:
root# ddrescue -f -n /dev/[baddrive] /dev/[gooddrive] /root/recovery.log
To image from disk to image file:
root# ddrescue -f -n /dev/[baddrive] /root/[imagefilename].img /root/recovery.log
Note: Many ddrescue tutorials recommend using the –rN component (which will cause it to try N times to rescue the block) in a second cloning pass in order to force the drive to read damaged/unreadable sectors. We recommend against using the –rN component, as damaged drives should be fully diagnosed by a professional to insure no further damage will occur by forcing it to read damaged areas. Forcing a malfunctioning drive to read damaged areas without first repairing it can cause further damage, resulting in irreversible data loss.
ddrescue Command Explained
Here’s an explanation of each of these components:
-fForce ddrescue to run even if the destination file already exists (this is required when writing to a disk). It will overwrite.-nShort for’–no-scrape’. This option prevents ddrescue from running through the scraping phase, essentially preventing the utility from spending too much time attempting to recreate heavily damaged areas of a file./dev/[baddrive]Identifies the source drive that will be copied. Fill this in with the name of your bad drive./dev/[gooddrive]or/root/[imagefilename].imgIdentifies the destination drive or image file where the data will be cloned. Fill this in with either the name of the good drive or the image file name of your choice./root/recovery.logThis creates a logfile, which is essential if you’re performing multiple passes. You can name the logfile anything. Without a logfile, you can’t make additional passes on areas of your disk with bad sectors.
Some other useful command options for the process include:
-r3Tells ddrescue to keep retrying damaged areas until 3 passes have been completed. If you set ‘r=-1’, the utility will make infinite attempts. However, this can be destructive, and ddrescue will rarely restore anything new after three complete passes.-DShort for ‘–synchronous’. This issues an fsync call after every write.-dShort for ‘–delete-if-done’. Deletes the given logfile “if all the blocks in the rescue domain have been successfully recovered.”-e [+]nShort for ‘–max-errors=[+]n’. This sets the maximum number of error areas allowed before ddrescue gives up, and it can be used to prevent the utility from running infinitely.-vShort for ‘–verbose’. This sets “verbose” mode, providing additional details. Can be useful for diagnosing issues.-SShort for ‘–sparse.’ This compels ddrescue to use sparse writes — blocks of zeroes aren’t allocated on the disk, which can save space. However, it can only be used for regular files, and it is not an available option on all operating systems.
A full list of usable commands can be found here in the ddrescue manual.
Precautions When Cloning with ddrescue
ddrescue is a powerful utility and should only be utilized by experienced Linux users. It can cause damage to a failing hard drive in some circumstances. It can also overwrite data when used incorrectly. We want to reiterate — if you really need your data and your hard drive is failing, your best bet is a professional data recovery service.
You should immediately turn off your computer if the failing hard drive seems to get worse, for instance if sounds get louder or if successive passes result in a larger number of bad sectors.
Be sure that the good drive doesn’t have any important data that might be overwritten. Make sure that you properly identify the good and bad drives when using the utility. Check for capitalization errors before starting the process, and don’t leave the hard drives unattended (if you do, you won’t be able to turn off the computer if serious errors occur).
If you have questions that weren’t answered by this article, you can find the full ddrescue manual here.