KVM (Kernel-based Virtual Machine) is the leading open source virtualization technology for Linux. It installs natively on all Linux distributions and turns underlying physical servers into hypervisors so that they can host multiple, isolated virtual machines (VMs). KVM comes with no licenses, type-1 hypervisor capabilities and a variety of performance extensions which makes it an ideal candidate for virtualization and cloud infrastructure implementation. But what are the benefits of KVM hypervisor and how do you get started?
In the following blog, we present the beginner’s guide to KVM on Ubuntu.
What is a KVM hypervisor?
KVM hypervisor enables full virtualization capabilities. It provides each VM with all typical services of the physical system, including virtual BIOS (basic input/output system) and virtual hardware, such as processor, memory, storage, network cards, etc. As a result, every VM completely simulates a physical machine.
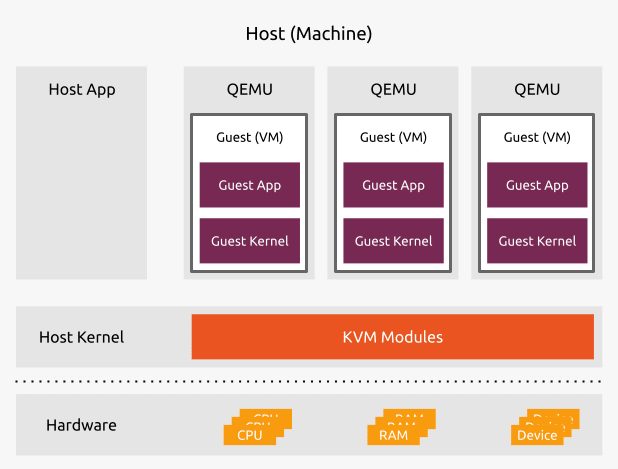
KVM is available as a Linux kernel module. It plugs directly into the kernel’s code and allows it to function as a hypervisor. Every VM runs as a separate Linux process under systemd, with dedicated virtual hardware resources attached. KVM can only be used on a processor with hardware virtualization extensions, such as Intel-VT or AMD-V.
KVM hypervisor benefits
The main benefit of the KVM hypervisor is its native availability on Linux. Since KVM is part of Linux, it installs natively, enabling a straightforward user experience and smooth integration. But KVM brings more benefits compared to other virtualisation technologies. Those include:
- Performance – One of the main drawbacks of traditional virtualisation technologies is performance degradation compared to physical machines. Since KVM is the type-1 hypervisor, it outperforms all type-2 hypervisors, ensuring near-metal performance. With KVM hypervisor VMs boot fast and achieve desired performance results.
- Scalability – As a Linux kernel module, the KVM hypervisor automatically scales to respond to heavy loads once the number of VMs increases. The KVM hypervisor also enables clustering for thousands of nodes, laying the foundations for cloud infrastructure implementation.
- Security – Since KVM is part of the Linux kernel source code, it benefits from the world’s biggest open source community collaboration, rigorous development and testing process as well as continuous security patching.
- Maturity – KVM was first created in 2006 and has continued to be actively developed since then. It is a 15-year-old project, presenting a high level of maturity. More than 1,000 developers around the world have contributed to the KVM code.
- Cost-efficiency – Last but not least, cost is a driving factor for many organisations. Since KVM is open source and available as a Linux kernel module, it comes at zero cost out of the box. Businesses can optionally subscribe to various commercial programs, such as Ubuntu Pro to receive enterprise support for their KVM-based virtualisation or cloud infrastructure.
Which hardware do you need to run a KVM server?
If you want to use a relatively low-cost server at home you can use a Intel / ASUS NUC as a server. They use approximately 25W and are very compact. My NUC has an and a separate 2TB WD Red SSD for the KVM images. XFS seems the best filesystem for KVM images. Reliable and fast with large files like KVM images.
How to install KVM on Ubuntu Server
In the following section, we present how to install KVM on Ubuntu 24.04 LTS in three simple steps.
Step 1: Install the required packages
On your Ubuntu 24.04 execute the following command to install the required packages and all their dependencies:
# apt update
# apt install qemu-kvm libvirt-daemon-system libvirt-clients bridge-utils virtinst virt-manager virt-top
Step 2: Check virtualization capabilities
Execute the following command to make sure your processor supports virtualization capabilities:
# kvm-okThe output of this command is pretty straightforward and clearly indicates whether KVM can be used or not:
INFO: /dev/kvm exists
KVM acceleration can be used
Step 3: Download an ISO image of the OS you want to install
Download the images you want to install
# wget https://releases.ubuntu.com/24.04/ubuntu-24.04.2-live-server-amd64.isoThis opens an interactive console that you can use to manually install the Ubuntu guest.
Step 3: Launch a VM
In order to launch your first Ubuntu Server 20.04 LTS instance on KVM execute the following command:
$ sudo virt-install --name ubuntu-guest --os-variant ubuntu20.04 --vcpus 2 --ram 2048 --location http://ftp.ubuntu.com/ubuntu/dists/focal/main/installer-amd64/ --network bridge=virbr0,model=virtio --graphics none --extra-args='console=ttyS0,115200n8 serial'This opens an interactive console that you can use to manually install the Ubuntu guest.